Menu application using Android
Following example shows that how to create menu application using Android. Follow the below steps to create.
a) copy the following code to “activity_main.xml”
<RelativeLayout xmlns:android="http://schemas.android.com/apk/res/android"
xmlns:tools="http://schemas.android.com/tools" android:layout_width="match_parent"
    android:layout_height="match_parent" android:paddingLeft="@dimen/activity_horizontal_margin"
    android:paddingRight="@dimen/activity_horizontal_margin"
    android:paddingTop="@dimen/activity_vertical_margin"
    android:paddingBottom="@dimen/activity_vertical_margin" tools:context=".MainActivity">

    <TextView android:text="@string/hello_world" android:layout_width="wrap_content"
        android:layout_height="wrap_content" />

    <ImageView
        android:layout_width="fill_parent"
        android:layout_height="wrap_content"
        android:src="@drawable/save"
        android:layout_centerInParent="true"/>


</RelativeLayout>

b) Now copy the follwoing code to "Main_Menu.xml" file

<menu xmlns:android="http://schemas.android.com/apk/res/android"
    xmlns:app="http://schemas.android.com/apk/res-auto"
    xmlns:tools="http://schemas.android.com/tools" tools:context=".MainActivity">


    <item android:id="@+id/item1"
        android:title="Item1"/>

    <item android:id="@+id/item2"
        android:title="Item2"/>

    <item android:id="@+id/item3"
        android:title="Item3"/>


</menu>

c) Now, copy the following code to "Main_Activity.java"

package app.mitindia.com.menuapp;

import android.support.v7.app.ActionBarActivity;
import android.os.Bundle;
import android.view.Menu;
import android.view.MenuItem;
import android.widget.Toast;


public class MainActivity extends ActionBarActivity {

    @Override
    protected void onCreate(Bundle savedInstanceState) {
        super.onCreate(savedInstanceState);
        setContentView(R.layout.activity_main);
    }

    @Override
    public boolean onCreateOptionsMenu(Menu menu) {
        // Inflate the menu; this adds items to the action bar if it is present.
        getMenuInflater().inflate(R.menu.menu_main, menu);
        return true;
    }

    @Override
    public boolean onOptionsItemSelected(MenuItem item) {

        switch(item.getItemId())
        {
            case R.id.item1:
                Toast.makeText(getApplicationContext(),"Item 1 selected", Toast.LENGTH_LONG).show();
                return true;


            case R.id.item2:
                Toast.makeText(getApplicationContext(),"Item 2 selected", Toast.LENGTH_LONG).show();
                return true;

            case R.id.item3:
                Toast.makeText(getApplicationContext(),"Item 3 selected", Toast.LENGTH_LONG).show();
                return true;

default:
    return super.onOptionsItemSelected(item);


        }

    }
}
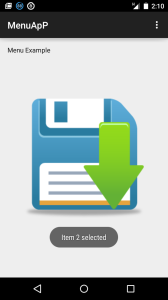
2) Run your application and observe the following output.